I want to share with you a fast and easy way to improve the product presentation on your store's category pages. A regular template will only display one product image, but with this modification you will be able to display a second image for every product in the category list.
What is it good for? If you sell clothing you can show a front and back view. If you sell jewelry, you can show larger view and a detailed (zoomed in) view. If you sell books you can show the front cover and then the back cover. The possibilities are many and you can change the pictures to suit your particular needs.
Instructions
Open the category.html file using WebDAV or the design mode feature in your control panel.
Add the following script at the bottom of the file (before the </body> element):
<script type="text/javascript">
$(document).ready(function() {

$(".ProductImage").hover(function() {
var image = $('img', this);
var product_slug = slugify(image.attr('alt'));
var next_image   = config.ShopPath + '/content/hover/'+product_slug+'.jpg';
image.attr('original', image.attr('src'));
image.attr('src', next_image);
}, function() {
var image = $('img', this);
image.attr('src', image.attr('original'));

});

});

function slugify(text) {
  text = text.replace(/[^-a-zA-Z0-9,&\s]+/ig, '');
  text = text.replace(/\s/gi, "-");
  text = text.toLowerCase();
  text = text.replace(/-+/g, '-');

  return text;
}

</script>
Now you have to create a folder that will store the secondary images on your WebDAV server. Use Cyberduck or another WebDAV client to create a folder named hover inside of the /content/ folder.
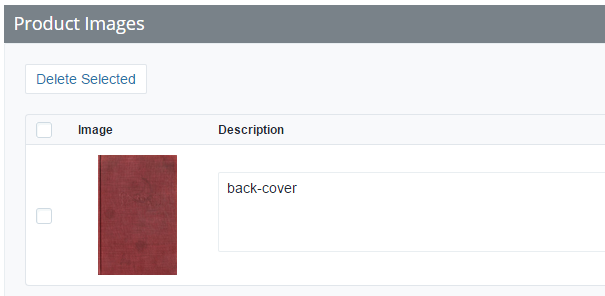
The next step will take a bit longer. You will have to modify the product images, and add the name of the secondary image inside the primary image description. For example, if the secondary image you want to show is named back-cover.jpg then add back-cover (without the file extension) as a description to the primary image.
It should look like this in the control panel:

Use your WebDAV client to upload the back-cover.jpg file to the /content/hover/ folder.
Repeat the same process for each product: add the image name without the file extension in the image description, and then add the image file to the /content/hover/ directory.
How does it work?
Just go to the category where you made the change and hover your mouse over a product image. It should automatically change the primary image to the secondary image that you defined in the control panel. It's that easy!
The script adds two functions to each product image: one function is called when the mouse enters the image area, and one function when the mouse pointer leaves.
The first function takes the alt attribute of the primary image and creates the path to the secondary image. It then replaces the primary image with the secondary image. The second function, called when the mouse leaves the area, simply resets the src attribute back to the original image.
Troubleshooting
If the secondary product image does not replace the primary image... then make sure your category page has the .ProductImage class in the code. Each individual product image should be wrapped in that class before the script can work.
If you get a red x, or a missing secondary image when you hover over the product... then make sure the path to the image is correct. Double check the image description name (make sure it does not contain the file extension), and make sure you uploaded the image to the /content/hover/ folder.
This is a simple change but it can have a big impact to the product presentation which should get you more sales!